Bluetooth on the Raspberry Pi Pico W opens the door to simple, wireless communication between your microcontroller and a PC, phone, or robot controller. It lets you transmit data without cables and is perfect for small robots, sensors and remote-control projects.
It’s important to know that Bluetooth actually comes in two flavours: classic Bluetooth and Bluetooth Low Energy (BLE). Classic Bluetooth is used for things like headphones and older serial modules, while BLE is designed for low-power, short bursts of data.
The Pico W supports BLE only, making it ideal for efficient, lightweight communication without draining your battery. In this tutorial, we’ll focus entirely on BLE and show you how to send and receive messages using the Pico’s built-in wireless capabilities.
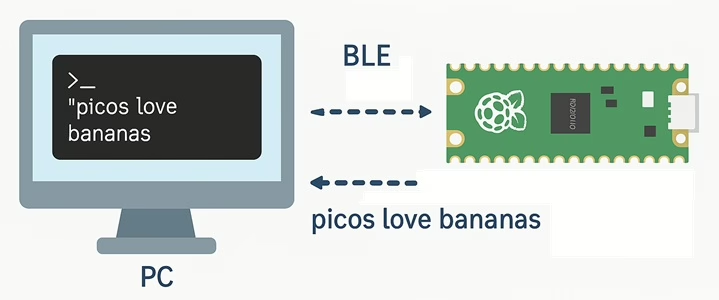
In this tutorial we will allow you to enter in some text, which then gets sent to the Pico via Bluetooth and then echoed back via the command prompt.
Set up your PC
In order to get started you will need to follow this tutorial then configure python to install Bleak.
Bleak is a lightweight, cross-platform Python library that makes it easy to communicate with Bluetooth Low Energy (BLE) devices from your computer. It handles scanning, connecting, sending data and receiving notifications, all with simple, asynchronous Python code.
To install Bleak on your system, just open a terminal or command prompt and run pip install bleak, or py -m pip install bleak – depending upon your set-up, and you’ll have everything you need to start building BLE applications in Python.
Use Thonny to create the following code and save it to your PC in a file called pc_echo.py.
import asyncio
from bleak import BleakClient, BleakScanner

UART_SERVICE_UUID = "6E400001-B5A3-F393-E0A9-E50E24DCCA9E"
UART_TX_UUID      = "6E400003-B5A3-F393-E0A9-E50E24DCCA9E"  # notify from Pico
UART_RX_UUID      = "6E400002-B5A3-F393-E0A9-E50E24DCCA9E"  # write to Pico


async def main():
    print("Scanning for PicoEcho...")
    device = None

    devices = await BleakScanner.discover(timeout=10.0)
    for d in devices:
        print("Found device:", d)  # debug
        if d.name and "PicoEcho" in d.name:
            device = d
            break

    if device is None:
        print("PicoEcho not found. Is the Pico running and advertising?")
        return

    print("Connecting to", device)

    async with BleakClient(device) as client:
        print("Connected:", client.is_connected)

        def handle_notify(_, data: bytearray):
            text = data.decode(errors="ignore")
            print("From Pico:", repr(text))

        # Start notifications from Pico
        await client.start_notify(UART_TX_UUID, handle_notify)

        print("Type messages to send to Pico.")
        print("Type 'quit' to exit.\n")

        while True:
            try:
                line = input("> ")
            except (EOFError, KeyboardInterrupt):
                break

            if line.strip().lower() == "quit":
                break

            # Send line + newline to Pico
            msg = (line + "\n").encode()
            await client.write_gatt_char(UART_RX_UUID, msg)

        try:
            await client.stop_notify(UART_TX_UUID)
        except Exception:
            pass

        print("Disconnected.")


if __name__ == "__main__":
    asyncio.run(main())
This is program will connect to the Raspberry Pico and allow transmission of a message to it.
Bluetooth Channels
In BLE communication, UUIDs act like unique identifiers that define the services and characteristics a device offers. They tell the connected device exactly where to send data and which characteristic to listen to for incoming messages. In this tutorial, these UUIDs are used to create a simple UART-style channel so the Pico and PC can reliably exchange text data.
The UUIDs in the example come from the Nordic UART Service (NUS). This is not part of the official Bluetooth SIG standard, but it has become a very common choice because it’s simple and widely supported. Libraries like MicroPython’s BLE examples and the Python Bleak library are already built to work with it. Developers can also define their own UUIDs if needed, but using the NUS set makes development much easier.
Here’s a quick reference for the UUIDs used:
| UUID | Purpose |
|---|---|
6E400001-B5A3-F393-E0A9-E50E24DCCA9E | The main UART service that links the TX and RX characteristics. |
6E400003-B5A3-F393-E0A9-E50E24DCCA9E | TX characteristic (Pico → PC). The PC subscribes to this for notifications. |
6E400002-B5A3-F393-E0A9-E50E24DCCA9E | RX characteristic (PC → Pico). The PC writes outgoing data here. |
If you want to explore more services, characteristics and vendor-defined UUIDs, Nordic provides an excellent reference list here:
https://developer.nordicsemi.com/nRF_Connect_SDK/doc/latest/nrf/protocols/bt/services.html
You can read more about how Bluetooth operates in energy saving environments in the How does BLE Bluetooth work? article.
Setting Up The Pico
Create the following file and save it to the Raspberry Pic as main.py.
import bluetooth
import time
from ble_uart import BLEUART
print("main.py starting (echo demo)...")
ble = bluetooth.BLE()
uart = BLEUART(ble, name="PicoEcho") # this is the BLE name
_last_connected = False # simple state flag
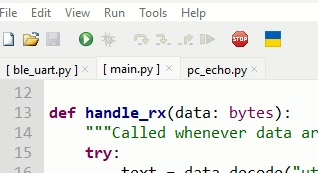
def handle_rx(data: bytes):
"""Called whenever data arrives over BLE."""
try:
text = data.decode("utf-8", "ignore")
except Exception as e:
print("Decode error:", e)
return
print("RX from PC:", repr(text))
# Echo it straight back (prefix so you can see it’s from Pico)
reply = "ECHO: " + text
print("TX to PC:", repr(reply))
uart.send(reply)
uart.on_rx(handle_rx)
print("Advertising as PicoEcho")
loop_count = 0
while True:
loop_count += 1
# Just a heartbeat so you know it's alive
if loop_count % 20 == 0:
print("loop heartbeat, connected =", uart.is_connected())
connected = uart.is_connected()
if connected != _last_connected:
print("Connection state changed. Connected:", connected)
_last_connected = connected
time.sleep(0.1)
Then create the following file and save it to the Raspberry Pico as ble_uart.py.
import bluetooth
from micropython import const

_IRQ_CENTRAL_CONNECT    = const(1)
_IRQ_CENTRAL_DISCONNECT = const(2)
_IRQ_GATTS_WRITE        = const(3)

# Nordic UART Service UUIDs
_UART_SERVICE_UUID = bluetooth.UUID("6E400001-B5A3-F393-E0A9-E50E24DCCA9E")
_UART_TX_UUID      = bluetooth.UUID("6E400003-B5A3-F393-E0A9-E50E24DCCA9E")  # notify
_UART_RX_UUID      = bluetooth.UUID("6E400002-B5A3-F393-E0A9-E50E24DCCA9E")  # write

_UART_TX = (_UART_TX_UUID, bluetooth.FLAG_NOTIFY)
_UART_RX = (_UART_RX_UUID, bluetooth.FLAG_WRITE)

_UART_SERVICE = (_UART_SERVICE_UUID, (_UART_TX, _UART_RX))


class BLEUART:
    def __init__(self, ble, name="PicoEcho"):
        self._ble = ble
        self._ble.active(True)
        self._ble.irq(self._irq)

        ((self._tx_handle, self._rx_handle),) = self._ble.gatts_register_services(
            (_UART_SERVICE,)
        )

        self._connections = set()
        self._rx_cb = None

        self._name = name
        self._adv_payload = self._build_adv_payload(name)
        self._advertise()

    def _build_adv_payload(self, name):
        name_bytes = bytes(name, "utf-8")
        payload = bytearray()
        # Flags: LE only, general discoverable
        payload.extend(b"\x02\x01\x06")
        # Complete Local Name
        payload.extend(bytes((len(name_bytes) + 1, 0x09)))
        payload.extend(name_bytes)
        return bytes(payload)

    def _advertise(self):
        # Advertise indefinitely every 100 ms
        self._ble.gap_advertise(100_000, adv_data=self._adv_payload)

    def _irq(self, event, data):
        if event == _IRQ_CENTRAL_CONNECT:
            conn_handle, _, _ = data
            print("BLE: central connected", conn_handle)
            self._connections.add(conn_handle)

        elif event == _IRQ_CENTRAL_DISCONNECT:
            conn_handle, _, _ = data
            print("BLE: central disconnected", conn_handle)
            if conn_handle in self._connections:
                self._connections.remove(conn_handle)
            # Restart advertising
            self._advertise()

        elif event == _IRQ_GATTS_WRITE:
            conn_handle, value_handle = data
            if value_handle == self._rx_handle:
                msg = self._ble.gatts_read(self._rx_handle)
                if self._rx_cb:
                    self._rx_cb(msg)

    def on_rx(self, callback):
        self._rx_cb = callback

    def send(self, data):
        if isinstance(data, str):
            data = data.encode()

        for conn_handle in self._connections:
            try:
                self._ble.gatts_notify(conn_handle, self._tx_handle, data)
            except Exception as e:
                print("BLE notify error:", e)

    def is_connected(self):
        return bool(self._connections)
The ble_uart.py file acts as a small helper library that hides all the low-level details of Bluetooth Low Energy communication on the Pico W. BLE is quite complex under the hood which involves services, characteristics, handles, advertising packets, connection events and more. Instead of making you deal with all of that, ble_uart.py wraps it into a simple, easy-to-use class called BLEUART.
This class sets up a UART-style BLE service, handles advertising, manages connections, and triggers a callback whenever data arrives from the PC. It also provides a .send() function so you can transmit data back. In short, ble_uart.py gives your Pico a clean, serial-like Bluetooth interface, letting you focus on sending and receiving messages without worrying about the BLE protocol details.
The main.py listens for anything the PC sends, prints it to the console, and then sends a reply straight back. It also prints status messages so you can see when the Pico is advertising or when a device connects. Put simply, main.py is the brain of your program that runs your logic and uses the Bluetooth helper to communicate with the outside world.
Testing
Once the files have been created and uploaded the code can be tested.
The Pico code can be started by clicking the green run button at the top of the editor (don’t forget to check the Pico is connected). In the console at the bottom of the screen the following text should be visible.
>>> %Run -c $EDITOR_CONTENT

MPY: soft reboot
main.py starting (echo demo)...
Advertising as PicoEcho
loop heartbeat, connected = False
loop heartbeat, connected = False
A heartbeat should be shown with a connected state of false. This shows that the Pico code is running, but hasn’t connected to the client yet.
Next, on the client run start running the client code by running the following:
py pc_echo.pyThe program should then run and look for the Pico. You should see the following:
Scanning for PicoEcho...
Found device: 7E:DB:66:5E:81:52: None
Found device: 28:CD:C1:0F:CB:30: PicoEcho
Connecting to 28:CD:C1:0F:CB:30: PicoEcho
Connected: True
Type messages to send to Pico.
Type 'quit' to exit.

>
The Thonny console should then show loop heartbeat, connected = True, demonstrating that the client has connected.
Going back to the console and typing "picos love bananas" into the prompt gives the following message.
> picos love fruit
From Pico: 'ECHO: picos love bananas\n'
>
In the console on Thonny you should see the following:
loop heartbeat, connected = True
RX from PC: 'picos love fruit\n'
TX to PC: 'ECHO: picos love bananas\n'
loop heartbeat, connected = True