An ultrasonic sensor measures distance using sound waves, not light. This makes it a great choice for beginner robotics projects, because it works well in bright light, darkness, and most indoor environments.
A very common ultrasonic sensor is the HC-SR04. It works by sending out a short burst of high-frequency sound, which humans cannot hear. This sound travels through the air, hits an object, and then bounces back to the sensor.
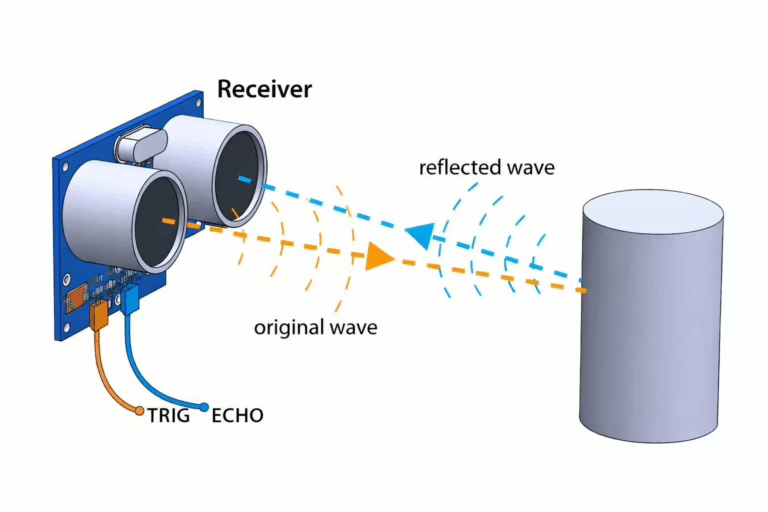
When using an ultrasonic sensor with an ESP32, the ESP32 controls when the measurement starts. It sends a short signal to a pin on the sensor called TRIG. This tells the sensor to send out its sound pulse.
After the sound is sent, another pin called ECHO changes state. The ECHO pin stays active until the reflected sound is detected. The ESP32 measures how long this pin stays active, which tells it how long the sound took to travel to the object and back.
Once the ESP32 knows the time, it can calculate the distance. Sound travels through air at a known speed, so time can be turned into distance. Because the sound has travelled to the object and back, the ESP32 first divides the measured time by two.
The ESP32 then multiplies this value by the speed of sound in air, which is about 343 metres per second. This gives the distance from the sensor to the object.
For example, if the measured time is 0.01 seconds, the ESP32 divides this by two to get 0.005 seconds. Multiplying this by 343 gives 1.715 metres, so the object is about 1.7 metres away.
This simple timing method is why ultrasonic sensors are so popular with beginners. They are easy to understand, easy to wire up, and very useful for things like obstacle detection and basic robot navigation.
You can read more about how ultrasonic ranging sensors work here.
Parts List
- Ultrasonic Rangefinder Sensor Module
- Freenove ESP32-S3 ESP32 S3 Board Lite
- 2 x MMOBIEL 1pcs Solderless PCB Breadboard Prototype Circuit Board
- ELEGOO 120pcs Multicolored Dupont Wire
Wire up the circuit
In order to run the project firstly the IHC-SR04 ultrasonic sensor module needs to be connected as shown in the diagram below. The circuit diagram below is shown for clarity and the actual connection on the breadboard follow.
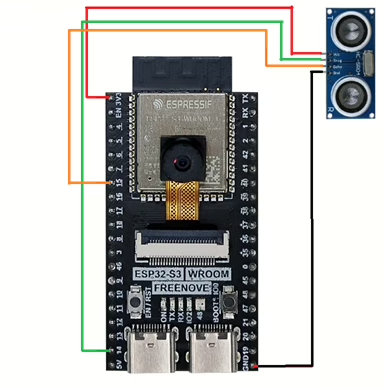
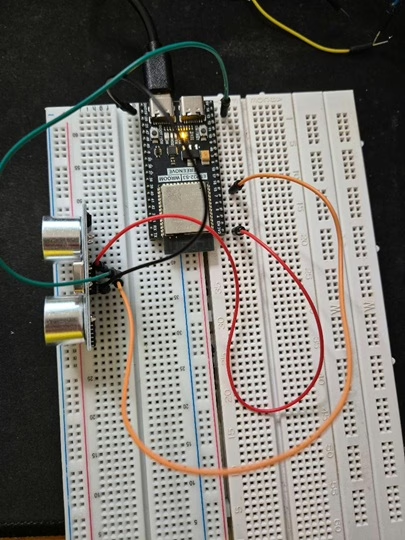
The circuit looks as shown below on the set up that was used to create this tutorial.
Running the Code
In order to get started you will need to follow this tutorial, which will ensure that your environment and ESP32 are configured correctly.
Now create a file called main.py on the ESP32-S3 with the following content.
from machine import Pin
import utime

TRIG_PIN = 14
ECHO_PIN = 15

trigger = Pin(TRIG_PIN, Pin.OUT)
echo = Pin(ECHO_PIN, Pin.IN)

def ping(timeout_us=30_000):
    # Send 10us trigger pulse (typical for HC-SR04)
    trigger.value(0)
    utime.sleep_us(2)
    trigger.value(1)
    utime.sleep_us(10)
    trigger.value(0)

    # Wait for echo to go high (start), with timeout
    start_wait = utime.ticks_us()
    while echo.value() == 0:
        if utime.ticks_diff(utime.ticks_us(), start_wait) > timeout_us:
            return None  # no echo (out of range / wiring issue)
    signaloff = utime.ticks_us()

    # Wait for echo to go low (end), with timeout
    while echo.value() == 1:
        if utime.ticks_diff(utime.ticks_us(), signaloff) > timeout_us:
            return None  # echo stuck high
    signalon = utime.ticks_us()

    # Pulse duration in microseconds
    timepassed = utime.ticks_diff(signalon, signaloff)

    # Speed of sound ~343 m/s = 0.0343 cm/us
    distance_cm = (timepassed * 0.0343) / 2
    return distance_cm

while True:
    d = ping()
    if d is None:
        print("No echo / timeout")
    else:
        print("Distance:", d, "cm")
    utime.sleep(1)
Next, click the run button and you should see the following in the console.
Distance :  193.2805 cm
Distance :  193.8979 cm
Distance :  86.436 cm
Distance :  86.76185 cm
Distance :  40.6455 cm
Distance :  40.45685 cm
Distance :  86.864744 cm
Distance :  7.42595 cm
Distance :  6.8599996 cm
The output represents the distance from the sensor to the nearest object in front of it. You can try moving objects in front of the sensor closer and further away to see the sensor working.